The Sprinkler Control
Leonidas is a modified version of a standard impact sprinkler, and to understand how he works it's important to understand how the impact sprinkler works when left around. The head of the impact sprinkler looks like this:
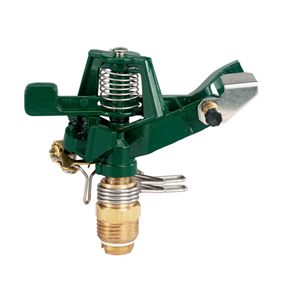
It has two parts, the body and the impacting arm. The body can rotate freely on the sprinkler's stand, and is essentially just a nozzle which shoots out water. The impacting arm is mounted to the body, and at rest sits in the way of the stream of water. When the water gets turned on, it throws the impacting arm out of the way, and when the impacting arm swings back it hits the body hard enough to move it a small amount. This causes the "Tch-Tch-Tch" sound that water sprinklers make.
More importantly to our project, there's a metal switch sticking out of the body that can change the direction that the sprinkler moves. Normally, some stationary stops are attached to the sprinkler. When the sprinkler has moved all the way to the end of it's range, the switch is tripped by one of the stops and the sprinkler starts travelling over to the other side. Once it reaches that side, the switch is tripped and it heads back.
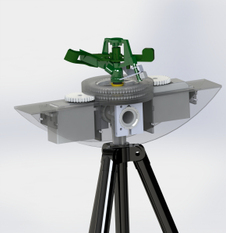
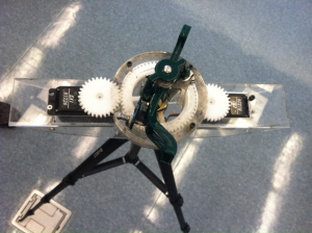
In Leonidas, we swapped the stationary stops out for a set of moving stops, allowing us to explicity clontrol the sprinkler's range. At the risk of introducing spoilers, here's a render and a photo of Leonidas' final design:
More importantly to our project, there's a metal switch sticking out of the body that can change the direction that the sprinkler moves. Normally, some stationary stops are attached to the sprinkler. When the sprinkler has moved all the way to the end of it's range, the switch is tripped by one of the stops and the sprinkler starts travelling over to the other side. Once it reaches that side, the switch is tripped and it heads back.
In Leonidas, we swapped the stationary stops out for a set of moving stops, allowing us to explicity clontrol the sprinkler's range. At the risk of introducing spoilers, here's a render and a photo of Leonidas' final design:
|
|
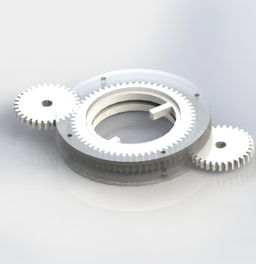
The big circular gearbox is where all the magic happens, so let's take a closer look at it:
|

|
The mechanical stops sticking into the center of the gearbox will trip the switch on the sprinkler body. Just as importantly, though, there is space for the sprinkler to move when it's not being tripped by the stops. To keep the centers of the gears free, we had to constrain our gears from the outside instead of fitting them onto a central shaft. This setup can't withstand much load before the teeth of the gears start to dig into the gearbox walls (the actual gears are made of delrin to maximize slipperyness, but the gearbox is made of much cheaper acryllic). Fortunately, we don't need to put much load on them - the switch is easy to trip, and they don't have to drive anyhing but themselves.
With this system, we can let the sprinkler cover any range from 0-360° while at rest, without powering the servos at all. When we want to target somebody, we simply constrict the range and then turn the stops until they point the nozzle of the sprinkler directly at our target. It really doesn't get much simpler than that.
The rest of the sprinkler control design is just providing a solid attachment point for the two servos powering the gearbox. Notably, we've geared the servos up. We can do this with confidence because our servos can make eight full turns, far more than we'll even need to make with the mechanical stops. We also mounted the whole system on a cheap tripod to make it more menacing and improve its range.
The Sensitive Areas
Waterproofing the system, while not as complex a problem as the actual control of the sprinkler, is just as important because if it fails all of our expensive electronics will die. We had to waterproof 3 distinct systems: The servos, the Raspberry Pi, and the Camera, and keep lines of communication open between this.
The highest-risk component was definitely the Raspberry Pi, so we turn to its waterproofing first. We bought a cheap waterproof box from amazon, and cut a small slit into one of its sides. We then fed a ribbon cable through the slit, which would eventually carry it's power and the PWM signals heading to the servos. We also slid a special ribbon cable designed for the camera board through the slit, and then filled the slit with hotglue. The box itself had a hinged lid with an o-ring around the seal, letting us easily access the Pi while inside the box.
With this set up, we turned to the servos. While easier to replace and harder to damage, the servos are in a much higher-risk location. Because the servo casing is mostly waterproof already, we decided to simply waterproof the weak points in the casing. Initially, we did this by packing the gearbox with petroleum jelly and plasti-dipping the entire servo casing. This worked stellarly as waterproofing, but the grease pack upped the friction in the gearbox enough to seriously impact the performance of the servos. Once it became clear that we wouldn't be able to get the performance we needed out of the waterproofed servos, we changed tack and removed the grease from the gearboxes. Our final waterproofing involved a thin ring of vaseline around the output shaft of the servo along with the same plasti-dipping procedure we used before. While not as absurdly waterproof, the servo's readtion time dropped to an acceptable amount.
The last component that needed waterproofing was the camera board. To waterproof it, we built a small acryllic box with a hole positioned right over the lens of the camera. We then used JB weld to affix a cameraphone wide angle lens into that hole, and we taped up the bottom of the box where the camera's ribbon cable came out. This setup worked fantastically at keeping water off of the camera board, although the wide-angle lens often had drops of water form on it and obscure the image.
